How to Secure Your Kayak or Canoe for Travel
Anyone who paddles a kayak or canoe must have a way to transport it to and from the water. Serious paddlers consider this whenever they choose a vehicle.
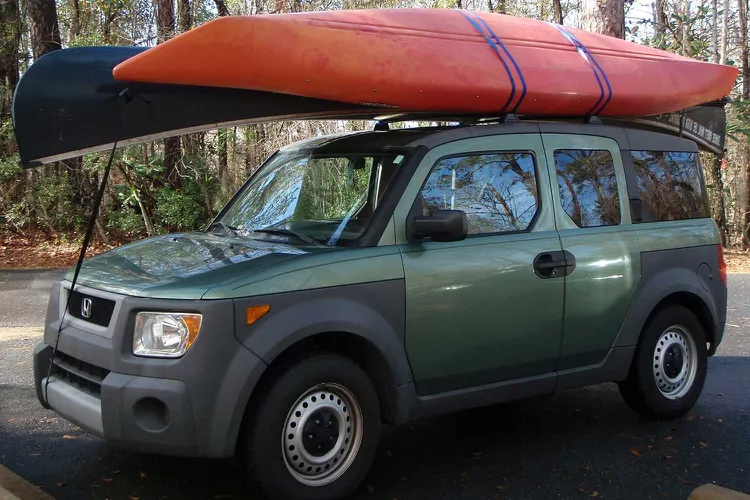
While canoe and kayak roof racks can be fitted to virtually any car, truck, or SUV, some manufacturers make installation easier than others. This comprehensive guide will describe how to securely attach a canoe or kayak to either a factory-installed or aftermarket roof rack. When in doubt, it’s best to consult the instruction manual that came with your vehicle or roof rack.
01. Lay the Kayak Straps Over the Bars of the Roof Rack

The first step in securing your canoe or kayak is to lay the straps over each bar. Be careful to position the buckles away from your car’s door to prevent scratches. Thread each strap beneath and around each bar, laying the kayak straps flat against your vehicle.
Typically, boat straps have two ends: one with a metal buckle or clamp and one without. To avoid damaging your paint, rest the clamped end against the window while letting the non-metal end hang along the car’s body.
Before proceeding, it’s prudent to check the crossbars of the kayak rack to ensure they aren’t loose. If they are, tighten them accordingly. Most racks require an allen wrench, a handy tool to keep with your paddling gear.
02. Place Your Kayak or Canoe on the Roof Rack

Next, you’ll place the kayak on the roof rack. If you’re fastening the kayak directly to the roof rack crossbars, position the boat upside down to avoid damage. A standard plastic kayak should not be laid hull-side down, as this can cause indentations that may impact its tracking capability.
If you’re using kayak carrier pads or specialized attachments, place the kayak right-side-up. The orientation of the boat often depends on its design; for instance, some sea kayaks benefit from being oriented bow-first due to aerodynamics, potentially improving gas mileage by reducing wind resistance.
Positioning a whitewater kayak backward first allows the cockpit combing to rest against the back crossbar, utilizing the wind to hold it in place. For canoes, ensure it is centered on the crossbars for even weight distribution.
03. Bring the Canoe Straps Over the Canoe

With the boat resting on the roof, pull the straps over it towards the opposite side of the rack to prevent any potential damage. This can take some effort, especially for larger canoes, but it’s essential for ensuring safety and stability.
While pulling the buckle end, make sure the strap remains over the bar. Let the buckled end hang free as you pull the opposite end for additional length. Finally, toss the non-metal end over the boat. The goal is to get the straps securely placed without damaging the car, the boat, or yourself.
04. Secure the Kayak Straps

Now that the kayak is correctly positioned and the straps are on top, it’s time to secure them. Make sure the straps lay flat and aren’t crossed. Adjust the straps so the buckles rest against the kayak’s hull, then bring the other end beneath the crossbar and back to the buckle. Thread the straps through the buckles by pushing the button on the clamp, which opens a slot for the strap to fit through. Take up any slack by pulling the straps downwards.
These buckles function as one-way clamps, allowing the straps to slide through one way under tension. To release a strap, simply push the button and give it a tug. It is important to have the straps tight; some compression of your kayak is acceptable, as it will return to form once removed. If you plan to leave your kayak on the roof overnight, loosen the straps to relieve pressure and avoid potential damage.
05. Roll and Tie the Kayak Straps Up

Now that your kayak is securely strapped down, there’s just one final step to ensure everything stays in place. To prevent the straps from flapping in the wind and potentially damaging your vehicle, tie them up neatly.
The best approach is to wrap each strap around the portion of the roof rack that connects to the vehicle, then tie a knot with the end of the strap or tuck it under the other straps. Once completed, your kayak will be secure, allowing you to embark on your adventure with confidence.


