Summary of Climbing Mount Kilimanjaro
- How Hard is it to Climb Mount Kilimanjaro?
- How Altitude Affects the Body
- Arrival at Mount Kilimanjaro Airport
- Machame Route – The Whiskey Route of Kilimanjaro
- Day 1 – Climbing Mount Kilimanjaro
- Day 2 on Mt. Kilimanjaro
- Day 3 – Acclimatization Hike
- Day 4 – Barranco Wall
- Day 5 – Mweka Trail to Base Camp
- Day 6 – Mount Kilimanjaro Summit Day Uhuru Peak
- The Descent from Kilimanjaro Summit
- Relax after Climbing Kilimanjaro in Zanzibar
- What to Pack to Climb Mount Kilimanjaro
- What Kilimanjaro Route to Choose
- How Much Does it Cost to Climb Kilimanjaro?
I have to clarify a giant misconception about climbing Mount Kilimanjaro. It is not easy! Prior to our climb, we often heard, “Anyone can do it,” or, “Oh, it’s an easy climb.” This is simply untrue!
We were part of a group of seven strong individuals who had just cycled 4500 km across the continent of Africa. Despite our physical fitness, we all agreed that Climbing Mount Kilimanjaro was one of the most physically challenging experiences of our lives.
How Hard is it to Climb Mount Kilimanjaro?
While challenging, climbing Mount Kilimanjaro also provided some of the most exhilarating moments we’ve ever had. I’m pleased to report that our group successfully reached the summit.
To illustrate the challenge we faced, at our camp, another group of 22 people attempted the climb, yet only 9 reached the summit – that is less than fifty percent. On average, the success rate for climbing Kilimanjaro is about 65% when considering all routes.
Some routes have higher success rates but typically require more time and money, while others have lower rates. Proper preparations and good fitness levels significantly increase the likelihood of reaching the summit.
We plan to provide a detailed account of what to expect when climbing Mount Kilimanjaro from landing at the airport to summiting the peak.
How Altitude Affects the Body
Mount Kilimanjaro stands at an impressive height of 5895 meters. The trek begins in a lush jungle rainforest, so the altitude will be felt! Regardless of your physical fitness level, your body’s reaction to altitude can vary until you experience it firsthand.
I’ve known marathon runners who struggled with altitude sickness, while some heavy smokers performed surprisingly well during climbs.
When you ascend, you might experience at least one of the following symptoms:
- Headache
- Nausea
- Dizziness
- Loss of appetite
- Lethargy
- Difficulty sleeping
- Tingly hands.
We witnessed many climbers dealing with nausea on our descent from the summit. Be alert for signs of acute altitude sickness. Mild symptoms can be managed by slowing down, but if they worsen, it is essential to descend immediately. Never go higher if symptoms intensify.
The best advice is to acclimatize to altitude somewhere before arriving in Tanzania. This preparatory step ensures you understand how your body reacts to altitude, making the climb more manageable.
Arrival at Mount Kilimanjaro Airport
We arrived at Kilimanjaro Airport in Tanzania after flying from Addis Ababa in Ethiopia. Most flights land at Kilimanjaro Airport, conveniently located between Moshi and Arusha.
As we approached Mount Kilimanjaro, I felt a mix of excitement and anxiety. It was Dave’s birthday, and we were celebrating by climbing Africa’s highest mountain. Kilimanjaro ranks among the world’s great mountain treks.
After two months of cycling Africa, we felt in the best shape of our lives, ready to tackle this monumental peak despite some concerns about sub-zero temperatures.
Best Shape of Our Lives – Ready for Kilimanjaro
Cycling didn’t prepare us for carrying heavy hiking gear, so upon arrival at Kilimanjaro airport, we began searching for a tour operator to assist with our gear and climb.
We rented gear from our tour operator, included in our trekking price:
- Warm down jackets
- Sturdy hiking boots
- Trekking poles
- Gaiters
- Sleeping bags
- Tents
- We augmented our gear by purchasing supplies in Moshi.
- Skip to our full recommended gear list for Kilimanjaro
- Read tips for winter layering
We hailed a taxi and headed to Moshi based on our driver’s recommendation. After a 45-minute drive through the lush landscape, we arrived at Kessy Brothers Tours.
This local operator, recommended by our driver, provided excellent service at a fair price. We arranged for the Machame trek up Kilimanjaro the next day.
Machame Route – The Whiskey Route of Kilimanjaro
We opted for the Machame Route, also known as the Whiskey Route. This seven-day climb offers more challenges compared to the more common five-day Marangu Route (Coca Cola Route).
You can choose between six or seven days on the Machame Route; we recommend the longer option if time permits.
The Machame Route not only offers stunning scenery and challenges, but it also improves your chances of reaching the summit due to an additional acclimatization day. This aspect is essential for summit success.
Day 1 – Climbing Mount Kilimanjaro
Our journey began with a drive through lush jungles as we entered Mount Kilimanjaro National Park at the Machame Gate.
After signing in at park headquarters, we embarked on a five-hour trek up the mountains.
Mount Kilimanjaro presents a unique climbing experience as the trek transitions through multiple ecosystems before reaching the glacier cap.
The Kilimanjaro Climb Starts in the Jungle
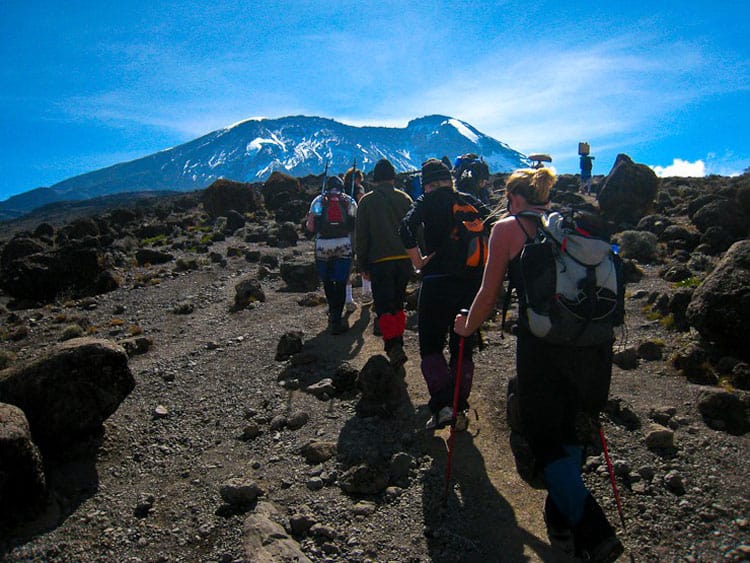
Drenched in sweat, we followed our guide, Coleman, through the jungle trail. His gentle reminders to proceed “pole, pole” (Swahili for slowly) helped maintain a manageable pace.
Time flew by as we marveled at the reality of climbing Mount Kilimanjaro! We arrived at our first campsite, the Machame Hut, situated at 3,000 meters (9842 feet), already feeling the altitude effects.
Machame Hut Camp
Fortunately, the evening was ours to rest, as our gear was provided and tents were pitched. We enjoyed soup and beverages, which helped replenish our electrolytes.
The hot, humid daytime temperatures gave way to a chilly evening. As we relished a hearty pasta dinner in our dining tent, we were grateful for our extra layers.
Night Time on Kilimanjaro
We turned in early to prepare for the days ahead, but not before gazing at Mount Kilimanjaro for the first time. The sun painted its snowy peak as it sank below the horizon over the African savanna.
Are we really going to climb that in just a few days? The camp fell silent as we admired a sky full of stars. We weren’t sure if we felt nervous or confident, but an overwhelming calm washed over us as we drifted off to sleep.
Day 2 on Mt. Kilimanjaro
The landscape transformed again on Kilimanjaro as we traversed the moorlands. This unexpected terrain featured fluctuating temperatures, transitioning from misty humidity to intense sunlight.
Today’s elevation gain was 900 meters, covering significant ground while crossing valleys and rivers. The lush green forest gave way to shrubs and low grass, creating beautiful scenery resembling the Arctic tundra.
Although tired, we managed the altitude well, maintaining a solid pace. As we ascended toward camp 2, Shira campsite, we found ourselves above the clouds. Our adventure was fully underway!
Day 3 – Acclimatization Hike
This day on our Kilimanjaro trek allowed us to explore. An acclimatization hike involves ascending to a higher altitude before returning to a lower elevation for rest. From 3900 meters, we climbed to 4600 meters, acclimatizing our bodies to the height.
With the trees now nearly gone, a vast valley opened before us, showcasing Mother Kilimanjaro looming overhead. Rock formations and lava tubes dotted the valley as we paused for photos at the iconic Shark Tooth Formation.
No other trek on earth boasts such a variety of ecosystems as Kilimanjaro.
We were blessed with blue skies and sunshine, revealing unobstructed views that left us in awe of the Roof of Africa.
One of the most awe-inspiring moments was hiking through a forest of giant cacti amidst massive boulders on our return to Barranco Camp.
Dave and I savored every moment, capturing photos and videos, even if we occasionally arrived at camp last. Our guides’ encouraging cries of “pole, pole” reassured us we were doing fine.
Climbing Kilimanjaro is not a race, and we valued every second spent on the trail, soaking up these once-in-a-lifetime views.
Day 4 – Barranco Wall
The next two days proved exhilarating as we scrambled up the steep Barranco Wall. This portion of the Mount Kilimanjaro climb was the most thrilling. By maintaining three points of contact, we ascended 257 meters (843 feet) above the Barranco Valley.
Awe enveloped us as we glimpsed the porters skillfully maneuvering the cliffs, managing their heavy loads with apparent ease.
Upon conquering the Barranco Wall, it was a few more hours of hiking through the Karanga Valley – our last reliable water point before the final ascent.
Camping above the Clouds
Reaching Karanga Camp left us speechless as we beheld our tents set up above the clouds, overlooking a stunning valley. Reality was sinking in now! We settled into camp, enjoyed a hearty meal, and watched the sunset illuminate the clouds below.
After a low-key evening, we retreated to our warm sleeping bags, conserving energy for the adventure ahead. By the time dinner ended, we had shared experiences with fellow climbers, and soon we were drifting into sleep high above the clouds.
Day 5 – Mweka Trail to Base Camp
The fifth day on our Kilimanjaro trek took us across a barren landscape, with the looming glacier overhead. Although it was a shorter day, it was welcome. The Whiskey Route allows for either six or seven days, and taking the full week significantly increases summit success chances.
More time at altitude means better preparation for the challenges ahead. After an early dinner, we headed to our tents for what we hoped would be restful sleep. Sleeping on Kilimanjaro can be tricky, with excitement from the previous day and anxiety about the next day weighing heavily on our minds.
Day 6 – Mount Kilimanjaro Summit Day Uhuru Peak
The morning of our summit day began with fitful sleep (if it could be called that). Our guides woke us at 11:15 pm, filled with nerves and excitement.
After nourishing ourselves with hot tea and cookies, we hit the trail just after midnight, making our final push toward the 5,985-meter summit. The frigid air invigorated us as we observed other climbers with headlamps already making their ascent. However, we felt strong and remained confident of reaching the summit in time for sunrise.
We pressed ahead for six hours, quietly passing other parties. This experience became a moment for silent determination, as each step drew us nearer to our goal.
The Mood Quickly Changed
Around 5500 meters, we began to feel the toll of the altitude. Our confidence waned, and each step became an arduous effort. Doubt started to creep into our minds, tempered by gasps for air and sips from freezing water bottles.
Some among us faced gastrointestinal issues, while others experienced moments of mental fatigue. Yet with unwavering resolve, we concentrated on moving forward.
Our guide, Coleman, limited our breaks, aware that prolonged stops could hinder our ascent. Only our sheer will propelled us onward.
Reaching the Summit of Mount Kilimanjaro
Remarkably, Coleman timed our summit perfectly, allowing us to reach the peak just as the sun broke through the clouds, revealing the majestic sunrise over Mount Kilimanjaro.
Standing alone at the famous Kilimanjaro billboard, we felt a quiet celebration. Although we were thrilled to reach the pinnacle of our climb, the experience felt strangely anticlimactic.
At -24 degrees Celsius (feeling closer to -40 with windchill), exhaustion and altitude effects dulled our anticipated euphoria. We snapped a few quick photos before descending as rapidly as we could.
The entire summit day took 9 hours – 6 hours to ascend, about a half hour at the summit, and another 2.5 hours to descend.
The Descent from Kilimanjaro Summit
Descending from the summit offered a chance to see the sheer cliffs and steep inclines we had faced during our climb. I was grateful we had made that journey in darkness; seeing those drops in daylight would have stirred fear.
We maneuvered down as quickly as possible, sliding upon the scree. Once established in a rhythm, the descent became easier, resembling a skating glide over the loose rocks.
A quick stop for food at our previous night’s camp, and we continued until reaching our final campsite at an altitude of 3,000 meters, where we would spend one last night on the mountain.
A Really Long Day
In total, our summit push and descent aggregated a grueling 30 hours of trekking on Kilimanjaro. The downward slope was steep and slippery; I must have fallen 15 times due to fatigue.
Descending Mount Kilimanjaro is a strenuous endeavor. It places immense stress on knees, calves, thighs, and the psyche.
Many trekkers we passed struggled with nausea and emotional exhaustion. Despite their questions about distance to the camp, I empathized and candidly responded that they had a long way to go. I sincerely hoped they succeeded, although time was against them.
Finally, we reached our tents by 3:30 pm, ready to collapse. Burrowing into our tents, a solid nap awaited us. We hadn’t even had the opportunity to celebrate summiting Kilimanjaro, as sleep took precedence.
After a refreshing nap at 3000 meters, we finally felt the exhilaration we initially anticipated at the summit. We just climbed Mount Kilimanjaro! Following a celebratory toast with champagne, the pain of the past hours faded from memory, replaced with joy.
Relax after Climbing Kilimanjaro in Zanzibar
Concluding our Mount Kilimanjaro Trek with a flight to paradise was an ideal ending. We boarded a small plane from Kilimanjaro airport, en route to Zanzibar.
Zanzibar is Tanzania’s island destination, where we spent days luxuriating on the beach, soaking up the sun and easing our tired muscles.
In no time, we forgot our discomfort, enthusiastically telling everyone we met, “Climbing Kilimanjaro wasn’t that bad; anyone can do it!” The experience was magical, igniting a sense of accomplishment that left us feeling invincible. However, first, we needed to unwind. Hakuna Matata (No Problem).
What to Pack to Climb Mount Kilimanjaro
Having trekked high altitudes since our Kilimanjaro adventure, we recognized that our gear was less than optimal for the climb we made. If we were to embark on this journey again, here is what we’d pack.
Packing List for Kilimanjaro
- Broken-in Hiking Boots – Avoid using them for the first time on the mountain.
- A suitable day pack featuring water bottle holders.
- Two water bottles (one insulated).
- Or a bladder, fitting within your day pack for insulation.
- Steripen – for sterilizing water using UV light.
- Purification tablets – keep readily available as a backup.
- Layering options – Breathable base layer (both legs and top), an insulating layer, and windproof and waterproof outer shells.
- Zip-off Trekking Pants – weather varies significantly from hot to cold.
- Breathable Trekking Shirts.
- A Warm Down Winter Coat.
- Two pairs of sunglasses (one may break).
- Headlamp with extra batteries.
- Portable USB charger for cameras and headlamps.
- Warm winter hat.
- Merino Wool Beanie.
- Peak hat suitable for daytime wear – one with a headlamp built-in is fantastic.
- Buff or balaclava.
- Liner gloves.
- Warm mittens.
- Camp shoes – you won’t want to wear your hiking boots continuously.
- 3-4 pairs of socks – vital for drying out between climbs and changing into dry socks at camp.
Purchasing a tent and sleeping bag may be necessary if your tour company does not provide them. We typically use the outfitter’s gear since it’s designed for those conditions, enabling us to travel light.
What Kilimanjaro Route to Choose
- Machame Route – 6 or 7 Days. This is the route we took and loved. It is not only the most beautiful option, but it also offers an 80% success rate for 7 days and 70% for 6 days, with challenging segments such as the Barranco Wall.
- Marangu Route – This route offers huts for shelter and is the most popular and crowded route, but it has the lowest success rate at around 40%.
- Lemosho Route – 7 or 8 Days. This relatively new route boasts stunning scenery without crowds, but comes at a higher price point while offering a 90% success rate!
- Northern Circuit – 9 or 11 Days. This route emphasizes a higher success rate by staying at lower altitudes for longer.
- Rongai Route – 6 or 7 Days. An excellent choice during the rainy season, beginning on the north side of the mountain.
Kessy Brothers provides a full breakdown on their website. Conducting thorough research will help determine which route aligns with your budget, skill level, and time availability in Tanzania.
How Much Does it Cost to Climb Kilimanjaro?
The cost to climb Mount Kilimanjaro varies widely. If you have the flexibility to book locally upon arrival, you can find excellent deals. Working directly with local operators allows you to sidestep higher western rates.
You can book tours in Arusha or Moshi, with Arusha serving as a main hub for travelers heading toward safaris.
On average, treks up Mount Kilimanjaro start at approximately $2000 USD. By booking in Moshi, we secured a competitively priced tour that matched the quality of more expensive options. Whether or not our tents were the glam versions, we received top-notch service and meals.
Don’t forget to tip your guides; we suggest a tip of 10-20% of the overall cost, reflecting their essential hard work.
Kilimanjaro Tour Companies
We were very pleased with our trekking experience through Kessy Brothers, based in Tanzania.
You can also consider organized tours from reputable companies such as Intrepid Travel or G Adventures, known for their reliability and quality.
If you’re looking for a more luxurious experience, Abercrombie & Kent, Geographic Expeditions, or Lindblad could be suitable choices.

