Photography Guide to San Francisco
- Hawk Hill – Two Icons In One Shoot
- Treasure Island – San Francisco’s Skyline
- Sutro Baths – San Francisco’s Heart
- Kirby Cove – Best Sunrise Photography San Francisco
- Twin Peaks – The City Glow
As a native San Franciscan, my knowledge of San Francisco is…let’s just say there’s not much that gets past me in my 7×7 city. This San Francisco photography guide will set you up for taking all those iconic images of memorable monuments.
Ultimate San Francisco Photography Guide
In this photography guide to San Francisco, you’ll discover where to photograph these destinations…
- Golden Gate Bridge and Transamerica Pyramid – Hawk Hill
- San Francisco Skyline best View – Treasure Island
- San Francisco Heart – Sutro Baths
- Best San Francisco Sunrise – Kirby Cove
- San Francisco City at Night – Twin Peaks
San Francisco Photography Tips with Google Maps and the Best Time of Day to Visit
If you’re craving a cornbread muffin, I can tell you where to get them hot! Want to see the new MOMA SF? I got you covered! Moreover, for all of you morning risers, I can show you where to take the best sunrise shots. When it comes to photography, my San Francisco guide has got you covered.
Let’s focus this adventure on photography in SF by detailing my 5 favorite spots along with the optimal shooting times.
I will also provide local San Francisco hashtags and Instagram hubs to increase your chances of being featured on social media.
1. Hawk Hill – Two Icons In One Shoot
It took me a while to find where the Transamerica Pyramid aligns with the Golden Gate Bridge, but I finally did! It’s somewhat tricky to get there, but I’ll simplify it for you.
How to Get to Hawk Hill
Go to Google Maps and type in “Conzelman Rd, Mill Valley, CA.” You should see a turning circle. This is your target navigation point. Once you arrive, look for a dirt parking lot with a restroom nearby. Park there.
Cross the circle to reach a dirt path (WARNING: don’t wander too close to the cliff!). I recommend visiting during daylight to familiarize yourself with the area, then return at night or early morning for the best shots.
Additionally, this area can feel a bit eerie late at night, so bring a flashlight and watch out for raccoons! Walk along the path for about 5-10 minutes (be cautious, as some sections might be narrow) until you get the perfect alignment.
- Best Time to Shoot: Night
- Recommended Gear: Tripod, Long Zoom Lens
2. Treasure Island – San Francisco’s Skyline
Treasure Island offers one of the finest views of San Francisco’s iconic skyline, comparable to Hong Kong’s Victoria Peak. Located just across the Bay Bridge, it is easily accessible, although finding parking can be a hassle typical of San Francisco.
How to Get to Treasure Island
Get on the freeway and take I-80 E towards Treasure Island. Stay in the far left lane while entering the Bay Bridge since the exit requires a sharp left turn. After the exit, follow the road until you catch sight of the stunning skyline on your left. I suggest parking near the hot dog stand if it’s not occupied by a bus.
- Recommended Gear: Telescope (good for viewing the Golden Gate Bridge), Wide Angle, ND Filter (for smooth water effects), Tripod
- Best Time to Shoot: Sunset, Night
3. Sutro Baths – San Francisco’s Heart
Sutro Baths is one of my favorite locations in San Francisco. The proximity to the water and the fresh breeze creates a calming atmosphere, excellent for landscape photography.
The parking lot can fill up quickly, and the staircase leading down to the baths can be a workout, but don’t let this deter you from exploring this enchanting site. Discover the caves, the rock-shaped heart, structural ruins, trail hikes, and more.
How To Get To Sutro Baths
Getting to Sutro Baths is straightforward; simply enter “Sutro Baths” into your GPS. Again, be ready to find parking and tackle the many stairs down… and back up!
- Best Time to Shoot: Sunset
- Recommended Gear: Wide Angle, ND Filter, Tripod
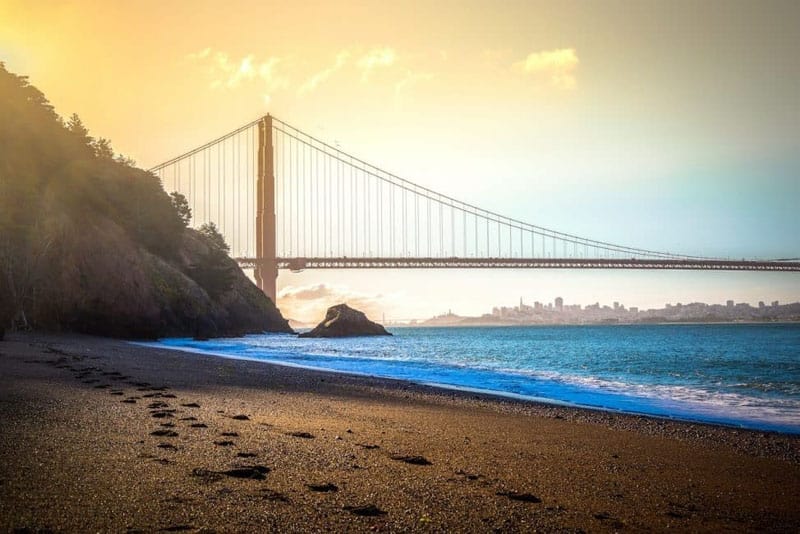
4. Kirby Cove – Best Sunrise Photography San Francisco

Kirby Cove is a hidden gem. This secluded beach, found on a hiking trail from Hawk Hill, features a man-made swing that allows you to enjoy the waves under the Golden Gate Bridge.
How To Get To Kirby Cove
Search for “Kirby Cove” on Google Maps and navigate there. Park along the left side.
It’s crucial to avoid leaving any valuables in your vehicle, as the area has seen numerous car break-ins!
Once parked, walk towards the gated path labeled “Kirby Cove.” The mile-long descent should take approximately 20-25 minutes.
Keep your camera at the ready as you might spot deer along the way!
- Recommended Gear: Wide Angle, Tripod
- Best Time to Shoot: Sunrise
5. Twin Peaks – The City Glow
Twin Peaks offers one of the best vantage points of the city, allowing you to see all of downtown, the Bay Bridge, and even the Golden Gate Bridge.
How To Get To Twin Peaks
Simply enter “Twin Peaks” into Google Maps, which will guide you to the top where there’s a parking lot available, requiring minimal hiking effort. If parking is full, consider circling the hill and finding a spot on the side.
Exercise caution in this area, especially if you’re unfamiliar. Some roads can change from one-way to two-way traffic! Always drive slowly, use your headlights, and pay attention to the signs!
- Best Time to Shoot: Night
- Recommended Gear: Wide Angle, Short Zoom, Long Zoom, Tripod
San Francisco Social Media Photography Hashtags
#alwayssf #bestofbayarea #nowrongwaysf #streetsofsf #ilovesanfrancisco #sfnative #mysanfrancisco #wildbayarea #thesanfrancisco #sfguide #sfdreaming
Note: San Francisco Hubs share the same handle as their respective hashtags!

